MeshDB
- MeshDB Schema Design
- MeshDB Status Values
- How to onboard applications to MeshDB
- How to Onboard Users to MeshDB
- PGAdmin
- How to bulk create installs for large buildings
MeshDB Schema Design
Background
MeshDB is an under-development software application with the goal of replacing the New Node Responses Google Sheet (the spreadsheet) as the source of truth for NYCMesh member, install, geolocation, device, and connection information via a proper SQL database. It is built in the Django ORM, using Python Model objects to represent underlying database schema structures. The schema used for development up to this point is unable to faithfully represent some edge cases that occur at atypical NYC mesh sites. In this document, we propose a modified schema and explain each edge case, detailing how the edge case will be represented under the proposed schema
The Schema (Simplified)
The following diagram depicts the proposed schema, showing the relationships between models (SQL tables), and some key attributes of each model. For clarity, non-essential attributes are omitted (see appendix A for a comprehensive diagram).

We propose the following models:
- Member - Represents a single NYC Mesh Member (even if they have moved between multiple addresses and therefore have multiple installs or "own" multiple active installs ). Tracks their name, email address, and other contact details
- Install - Represents the deployment (or potential deployment) of NYC Mesh connectivity to a single household. This most closely maps to the concept of a row in the spreadsheet. Tracks the unit number of the household, which member lives there, which building the unit is located within. It is keyed by install number, which corresponds to row number on the spreadsheet. With foreign keys to Member, Building, and Device, it acts as the central model, tying the entire schema together. Many objects have a status field, but the install status field maps most closely onto the status tracked in the spreadsheet today. Completed Installs have a foreign key to the device field (via_device) which keeps track of the device they use to connect to the mesh
- Building - Represents a location in NYC identified by a single street address (house number and street name). In the case of large physical structures with more than one street address, we will store one Building object for each address that we have received Install requests for. Buildings track a primary network number, to represent the way the site is referred to colloquially. In the case that a building has more than one network number, the primary network number will be set to the one volunteers designate as the “primary” (usually the first assigned, busiest router, etc.)
- Device - Represents a networking device (router, AP, P2P antenna, etc.). Most closely corresponds to a “dot” on the map. Not comprehensive of all devices on the mesh, only those that need a map dot. For big hub sites, this may be only the core router. Contains a mandatory field for “network number” (NN) which will be set to the NN of the device, or of the “first hop” router used by this device (for devices like APs which have no NN assigned). It contains optional lat/lon override fields, which can be used to refine the exact location of this device (e.g. for map display). When no lat/lon are provided for a device, is it assumed to reside at the lat/lon of the building it is associated with (via the Install model). Devices can optionally track which install delivers them power, via a powered_by_install foreign key to the Install model, which tells us which unit has the PoE injector.
- Sector - A special type of device (using Django Model Inheritance to inherit all fields from device) which adds additional fields related to the display of sector coverage information on the map (azimuth, width, and radius)
- Link - A connection between devices, which represents a cable or wireless link, whether directly between the devices or via other antennas not represented with their own device objects
Example 1 - NN492 - Typical Multi-Tenant Install

In this simple example, we have two tenants in a single building with a single address, both connected via cables directly to an omni on their shared roof. They are connected to the rest of the mesh via an LBE to Saratoga. The database tables for this scenario look like this:
Example 2 - NN 4734 - Cross-Building Installs

In this example, members in 3 adjacent buildings, each with their own address, are connected via a single omni, with cable runs across the roofs directly to the member’s apartments. They are connected to the rest of the mesh via an mant 802.11 sector at 4507. The database tables for this scenario look like this:
Example 3 - 7th Street (NN 731) - Multiple Omnis on one building

In this example, we have one regular tenant in a single building with a single address. However there is also a rooftop office with its own omni, connected wirelessly to the primary one. They are connected to the rest of the mesh via a GBELR to Grand. The database tables for this scenario look like this:
Example 4 - Vernon (NN 5916) - Courtyard APs
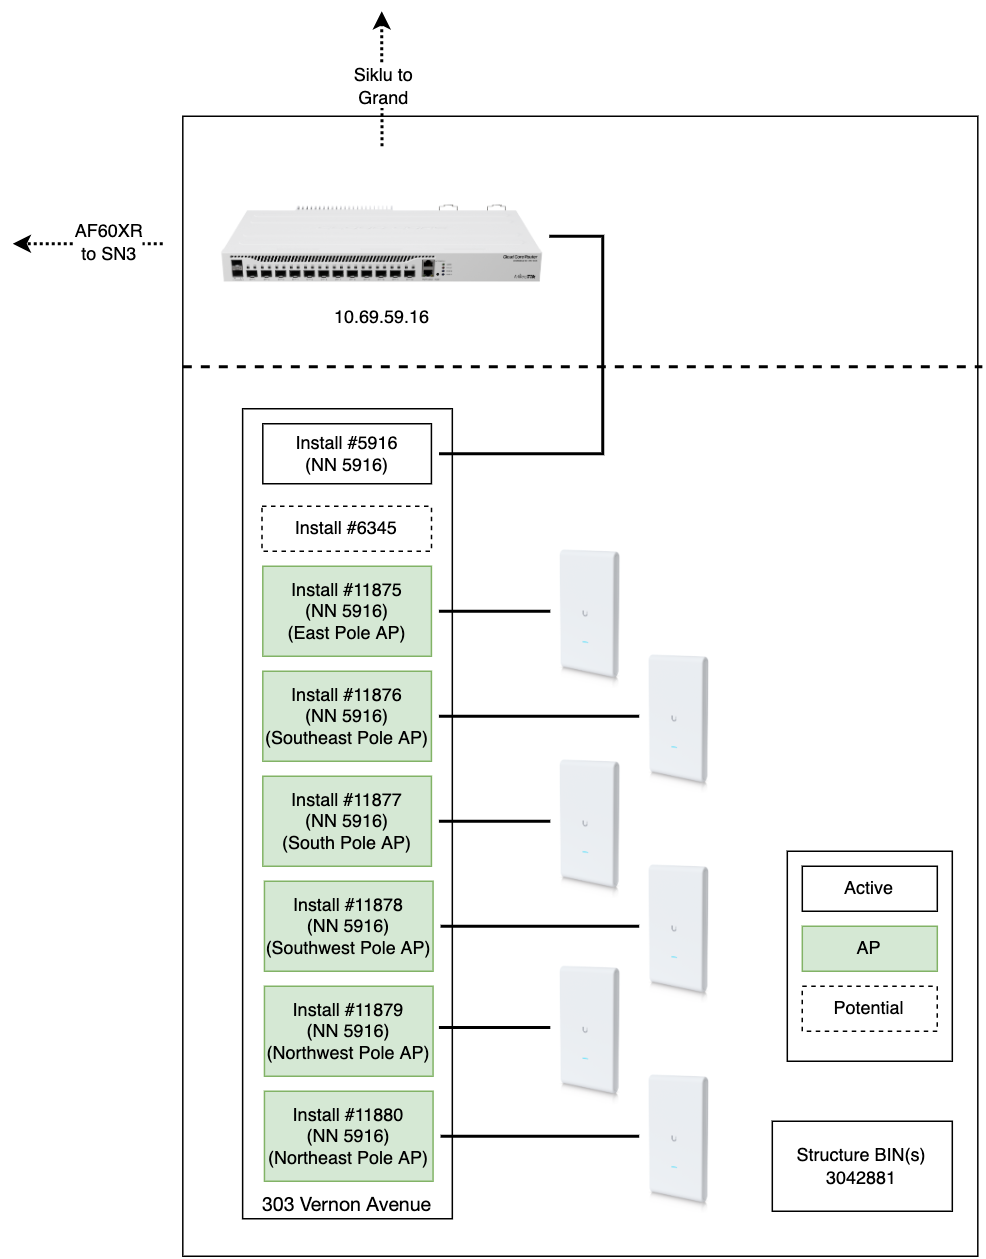
In this example, we have a core hub site in a single building with a single address. However, there are many Access Points (APs) on light poles in the building’s courtyard. These light-poles are unquestionably associated with the same building/address as the core router of this hub, but need to be shown separately on the map.
In this scenario, we treat the light poles as if they are “apartments” in the Vernon building. They each get their own install #, but imagining a tenant living in the light pole, we say that this imaginary install is “connected via” a device object representing the AP. The network number for these APs is set to 5916, reflecting their first hop router (and the fact they are not themselves assigned NNs). Links between the courtyard APs and the core router are included so that they are rendered on the map
The database tables for this scenario look like this:
Example 5 - Prospect Heights (NN 3461) - Multiple NNs for one building
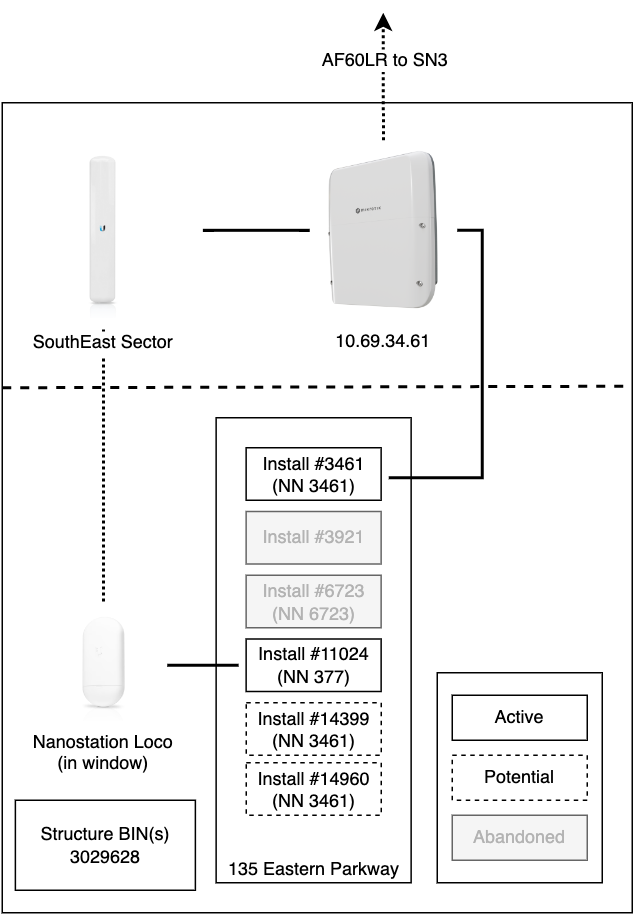
In this example, we have a core hub site in a single building with a single address. The primary NN 3461, also serves a member’s apartment as install #3461. However, there is another apartment which could not due to practical considerations be connected via a cable, and had to be connected via an antenna in their window to a sector on the roof. This antenna needed an NN for configen and naming, and so this building received multiple NNs.
The database tables for this scenario look like this:
Example 6 - Jefferson (NN 3606) - Multiple NNs for multiple buildings

In this example, we have a building with 4 addresses and 3 omnis on the roof, each with its own network number. There is no clean mapping between NNs and addresses, since each omni serves installs in multiple buildings. The omni of the primary NN, 3606, provides the uplink to Hex House (NN 1417).
The database tables for this scenario look like this:
Appendix A - Full Schema Diagram
The following is a complete schema diagram, showing all fields. New additions from the current implementation are shown in yellow, and removed fields are shown in red

MeshDB Status Values
Node Status
| Value | Description |
| Planned | An assignment of a network number to one or more install numbers that has not yet been brought online. This happens commonly when planning for new large hubs, but can apply to smaller installs also |
| Active | A nominally routable network number on the mesh |
| Inactive | A node which was active but is no longer connected to the mesh due to disassembly, abandonment, etc. If a node drops offline for a few days, it does not need to be marked Inactive, but if it is offline for a month or more, or is known to have been taken down, it should be marked Inactive |
Install Status
| Value | Description |
| Request Received | Default status when an install is created. It indicates that the join form has been submitted for the specified unit, but not much more |
| Pending | This install has LOS and an install has been scheduled, or is in the process of getting scheduled. We expect to connect this install in the near future. Installs should not remain in this status longer than 6 months |
| Blocked | We have received some kind of confirmation that the install identified by this row is 1) interested in getting connected and 2) is unable to actually go through with an install. Usually due to a landlord not cooperating |
| Active | A nominally connected unit, with active service |
| Inactive | This is a physically connected unit, with equipment in place but the equipment is not communicating with the mesh. This may be due to a power, cable, or software issue. Installs in this status are expected to reactivate at some point the future. If the install has been physically taken down or completely abandoned, it should be marked as Closed instead If an install drops offline for a few days, it does not need to be marked Inactive, but if it is offline for a month or more, this status is likely appropriate Installs should not remain in this status longer than 2 years |
| Closed | This install request is no longer something we are interested in tracking. This could be because the person communicated disinterest, asked to unsubscribe, gave invalid information in the join form. This status is also used for installs that have been abandoned, or physically taken down, and are not expected to be reactivated This could also be a duplicate of another install request |
| NN Reassigned | A special status for low-numbered installs indicating that this install number has been re-used as a network number for another node and is not safe to use as a network number for this install, should the unit associated with this install seek to get connected |
Link Status
| Value | Description |
| Planned | A future link that might be added to the mesh, if the specified devices are deployed. Does not need to be actively scheduled, but should have some chance at feasibly being completed (don't enter planned links that clearly have no LOS for example) |
| Active | A nominally online link that is able to pass traffic between its specified devices. That does not necessarily mean it is a primary path for any internet traffic (e.g. WDS backup links) |
| Inactive | A link which was active but is no longer able to pass traffic due to disassembly, abandonment, loss of LOS, etc. If a link drops offline for a few days, it does not need to be marked Inactive, but if it is offline for a month or more, or is known to have been taken down, it should be marked Inactive |
Device Status
| Value | Description |
| Planned | A future device that might be added to the mesh. Does not need to be actively scheduled, but should have some chance at feasibly being completed |
| Active | A nominally online device that is reachable on the mesh |
| Inactive | A device which was active but is no longer online due to disassembly, abandonment, power issue, etc. If a device drops offline for a few days, it does not need to be marked Inactive, but if it is offline for a month or more, or is known to have been taken down, it should be marked Inactive |
How to onboard applications to MeshDB
These instructions are for creating API access for automated systems. For human users, see How to Onboard Users to MeshDB
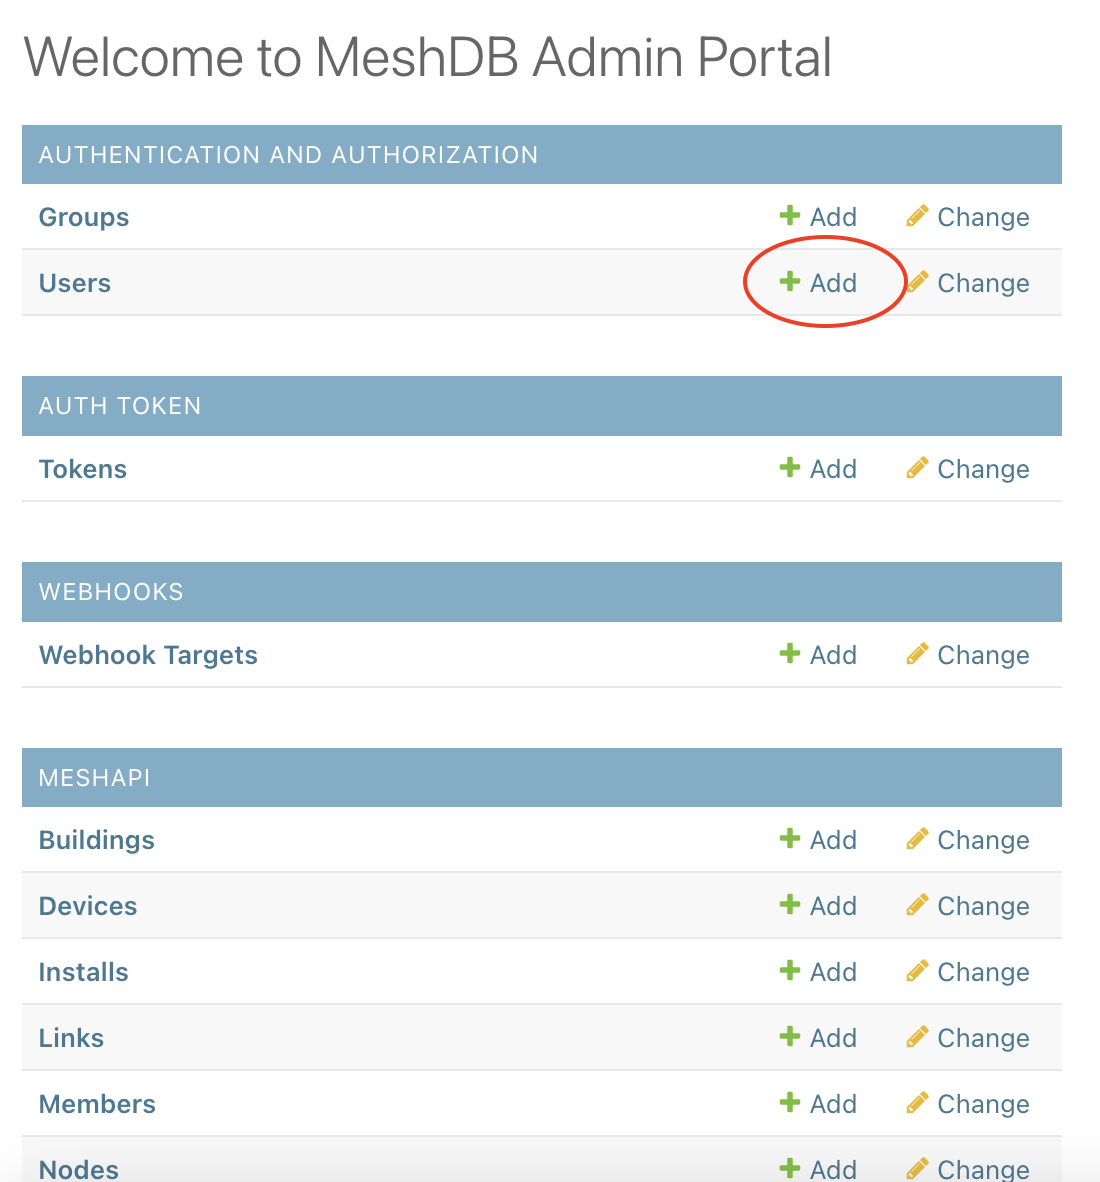
Adding a new user for an application

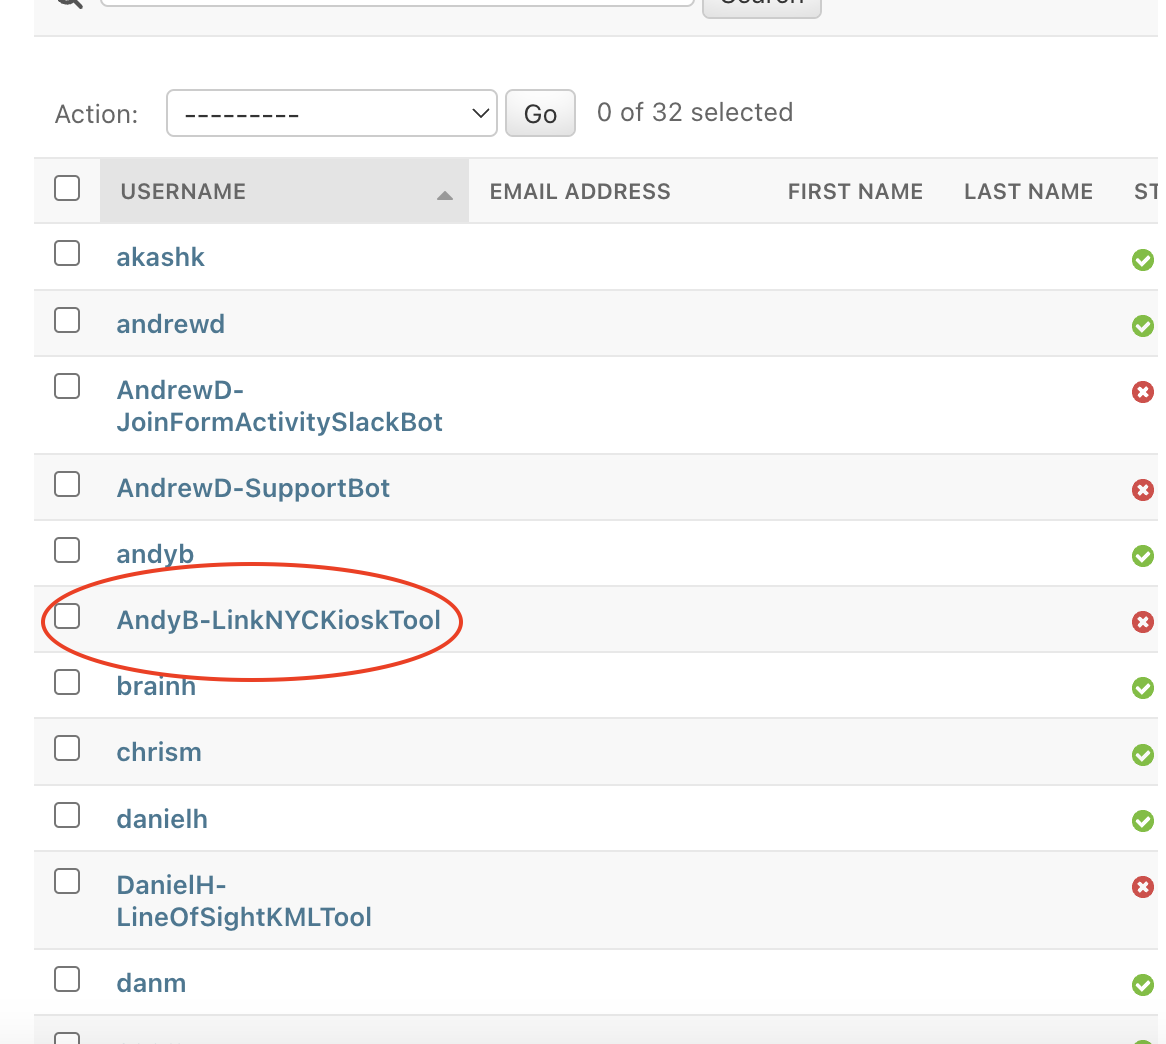
Make a new user specifically for the application, not just the author of the application. For example, if Andy is creating an application to measure member distance to link NYC kiosks, don't create a user called AndyB, create a user called AndyB-LinkNYCKioskTool. For the password, enter something secure, like a random password generated by your browser, but there is no need to save this password, we will use a token to authenticate this user.

Save the user, and then click on the username in the Users list to add the necessary permissions directly on the user object. Do not add the user to any groups. Do not grant the user Staff or Superuser permissions
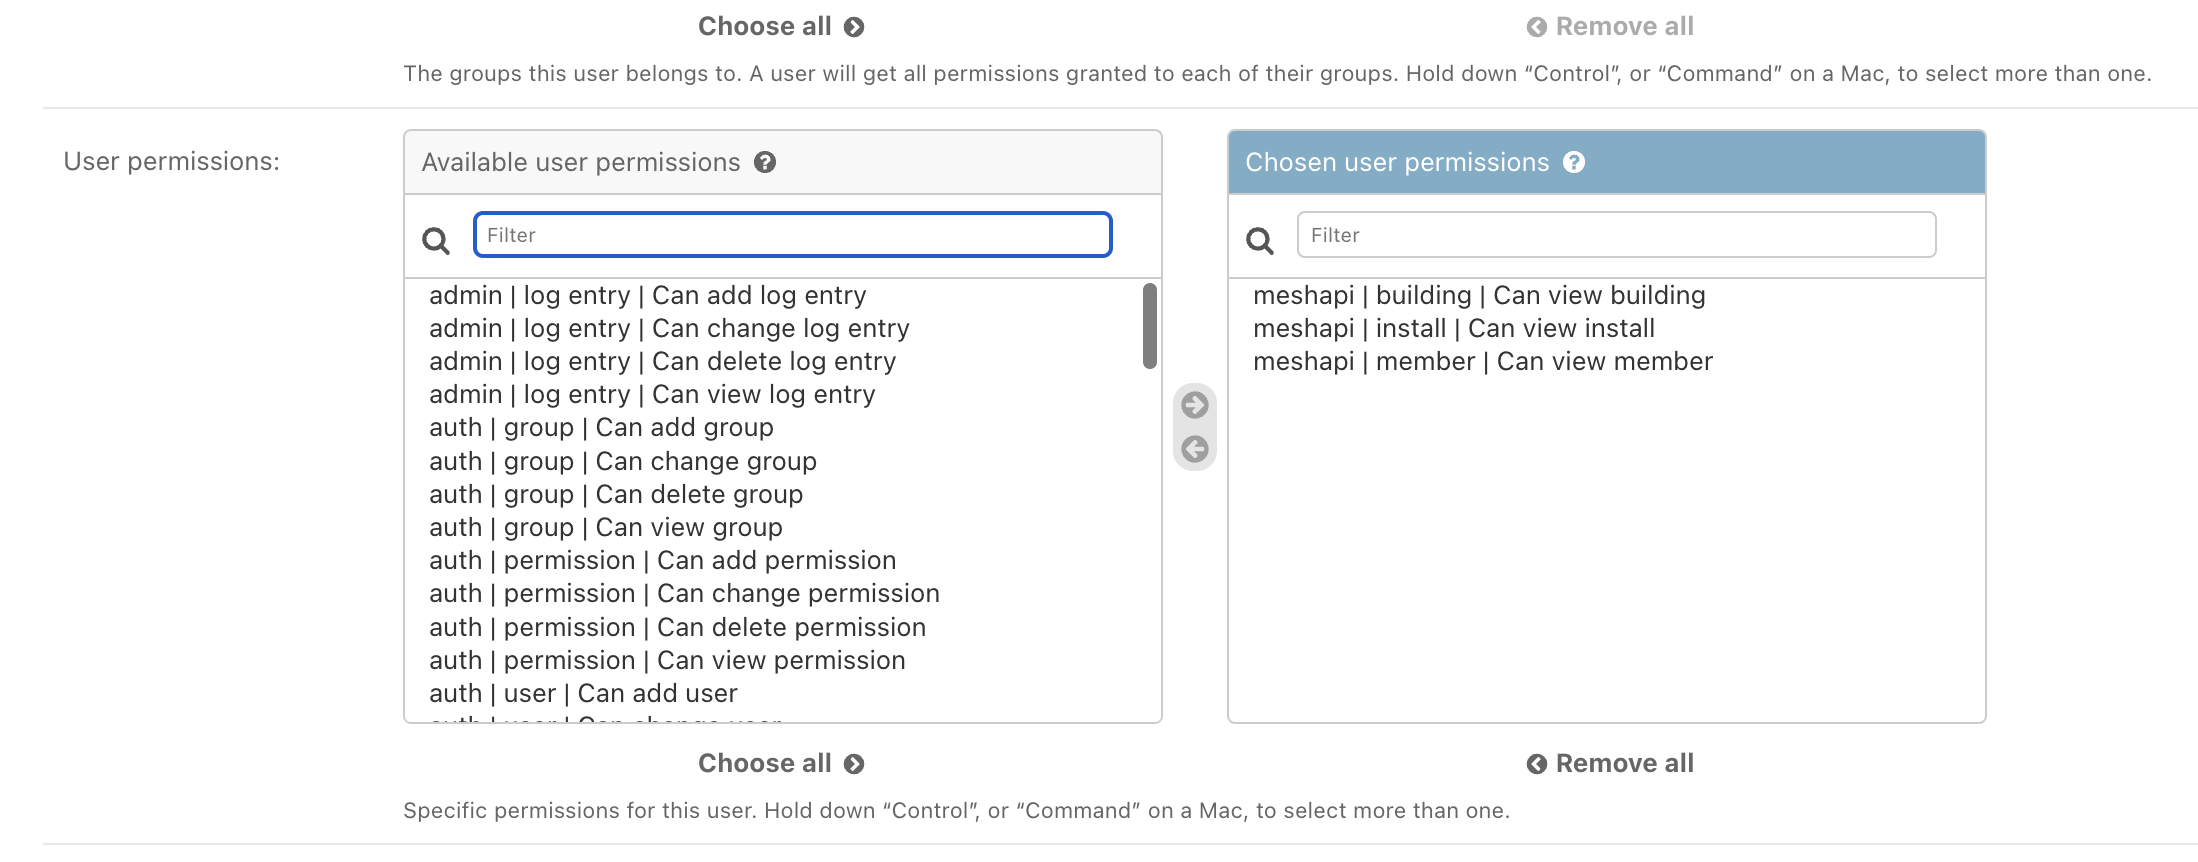
Use the arrows or double click to select permissions from the list of all possible permissions the application could be granted. Most applications do not need change/delete/add permissions. In this example, we grant Andy's tool "view" access to the Install, Building, and Member tables. Save the changes you've made to the user object.
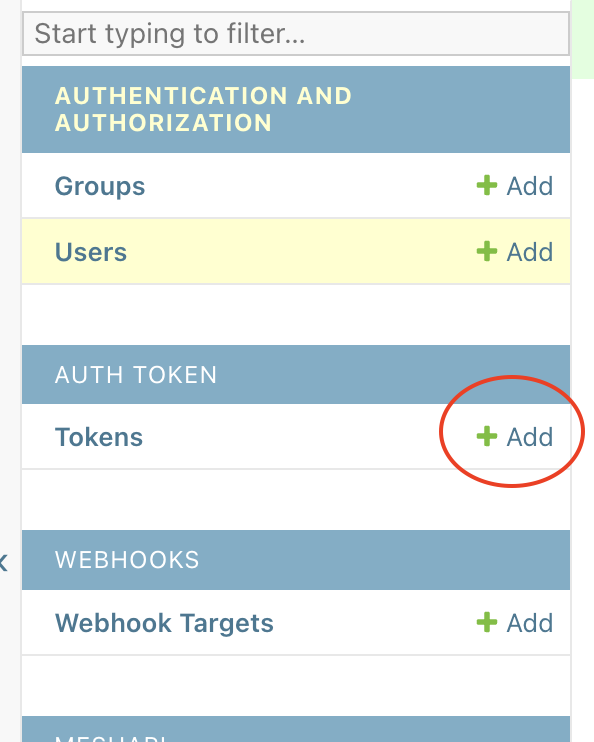
Adding an API token
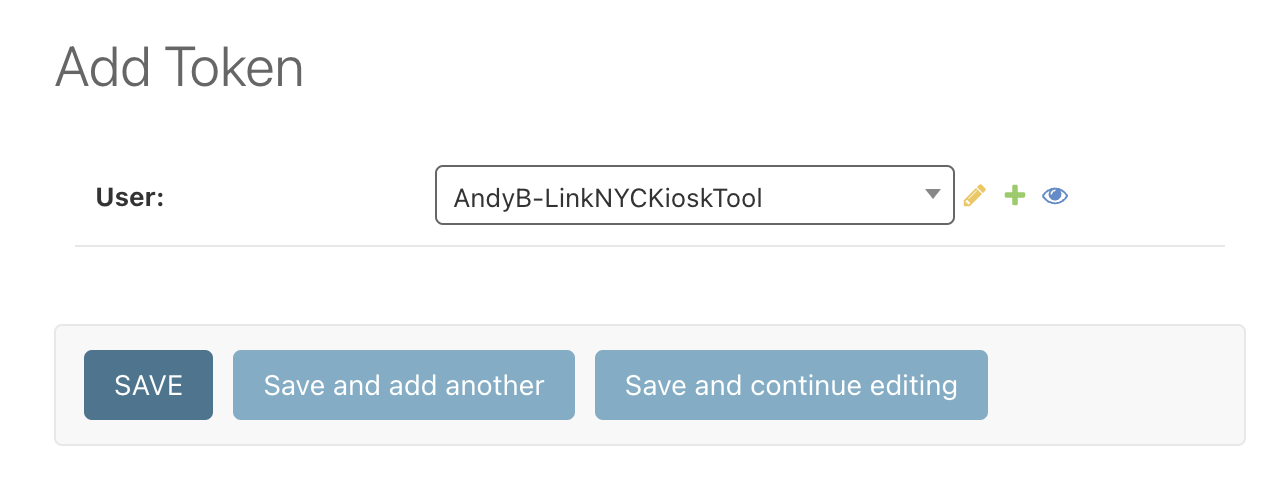
Follow the instructions under Adding a new user for the application above. Then select "Add" next to Tokens. Select the user you just created in the dropdown provided
Save the new token, then send it to the author of the application. For more information on using this token to query the API, see the API docs here: https://db.mesh.nycmesh.net/api-docs/swagger/
Adding a new web hook recipient
Follow the instructions under Adding a new user for the application above. You may use the same "User" object for both tokens and web hooks if they are for the same application.
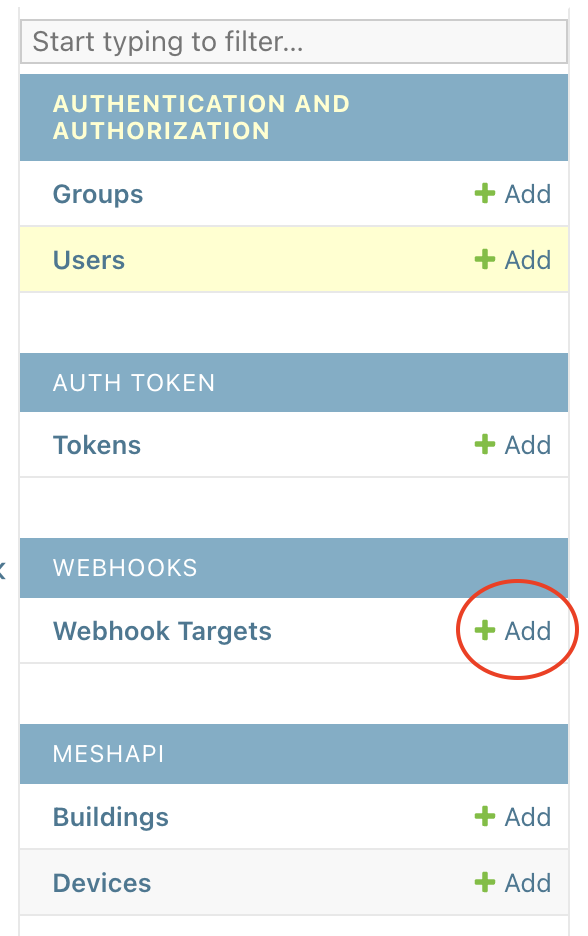
Select the "Add" button next to Webhook Targets, then use the magnifying glass icon to select the user you created for this application. Enter the target URL for the notification delivery (will be provided by the application owner). This URL will receive an HTTP POST request every time the selected event is fired.
 .
. 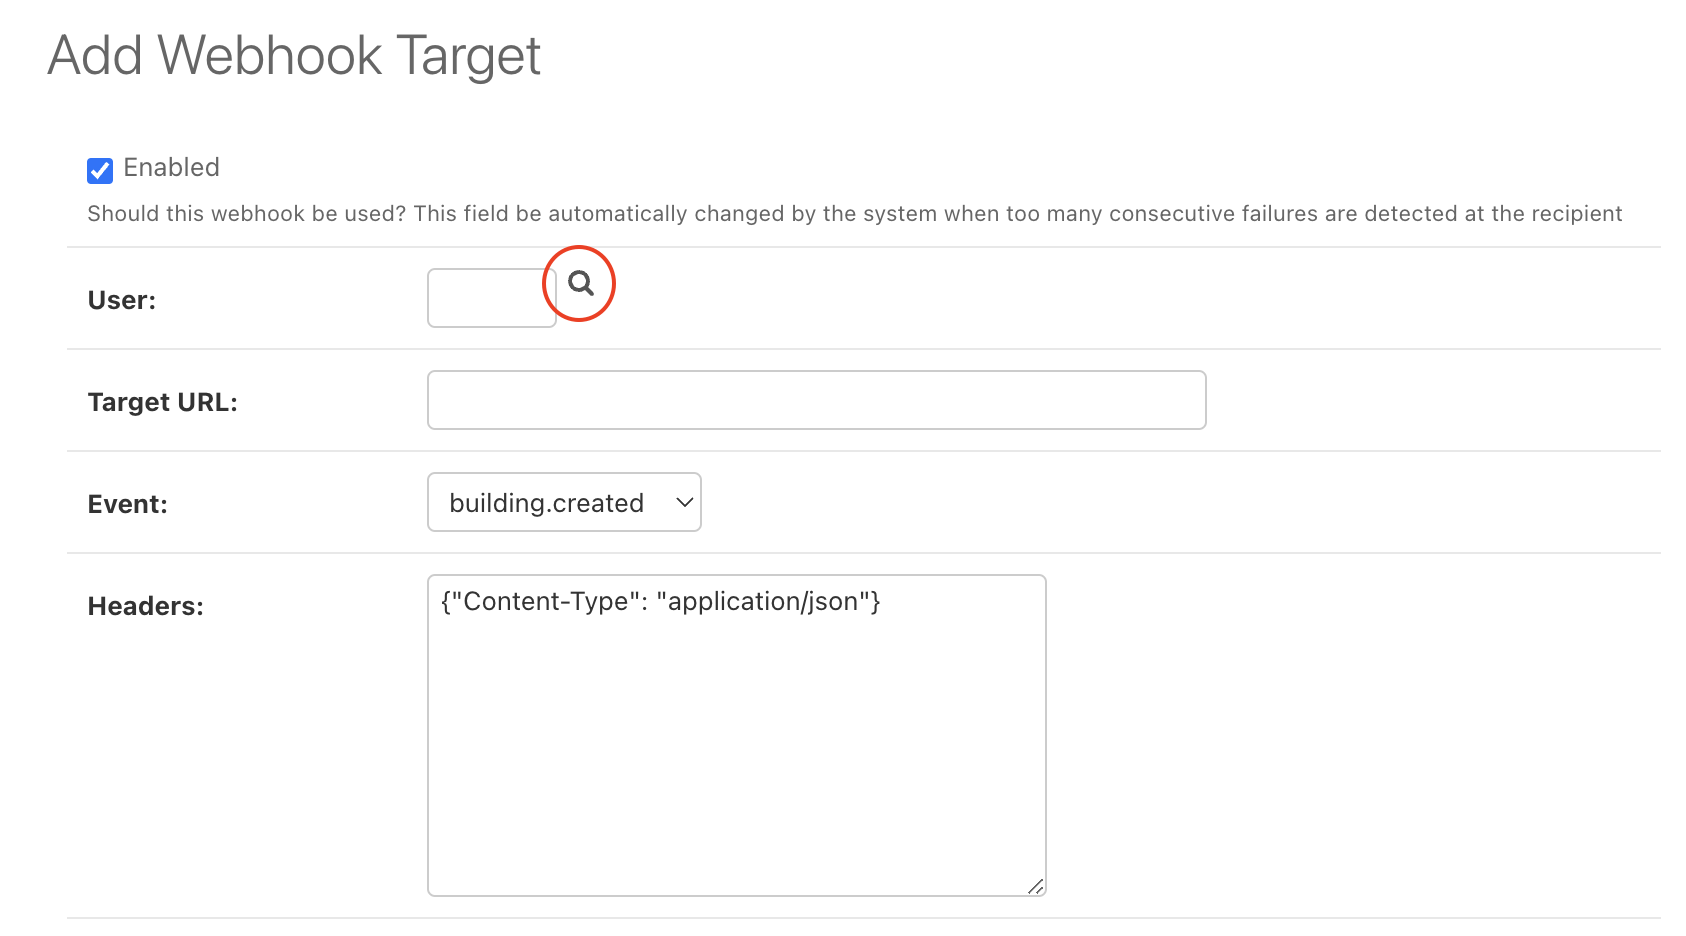
Select the appropriate event in the dropdown based on the event the application needs to receive, and save. If the application needs to receive more than one event type, add a separate webhook target for each event they need to receive.
How to Onboard Users to MeshDB
These instructions are for creating administrator console access for human users. For automated systems, see How to onboard applications to MeshDB
Adding a new user for admin console access
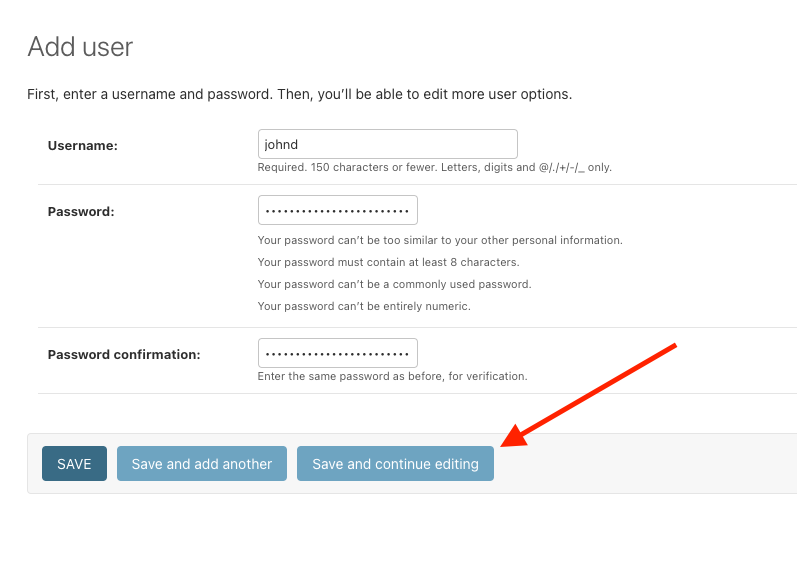
Every individual person should receive their own unique user object. User objects should not be shared among multiple volunteers. We have established an informal convention of using the volunteer's first name followed by their last initial. For example if the volunteer's name is John Doe, we would create their username as johnd. For the password, enter something secure, like a random password generated by your browser. Save this password and send it to the volunteer over slack (and encourage them to change it immediately using the link in the top right).
Click Save and continue editing to proceed to the full user editor
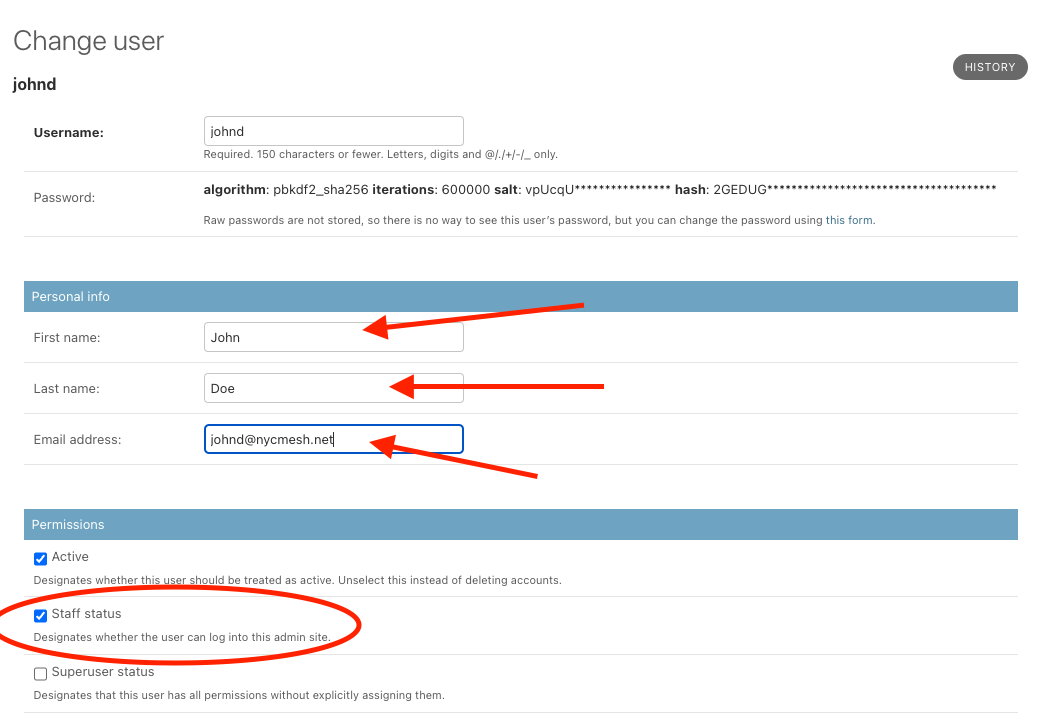
Here, set the volunteer's first and last name and email (if available). Then enable Staff status, which allows them to log in to the admin site.
Finally, you need to add the new user to the appropriate group based on their needed permissions. The following table summarizes the difference in permissions between the various groups:
| Group | Permissions | Example User |
| Read Only | View-only permissions to all MeshDB core data such as Member Contact info, install details, buildings, etc No access to authentication information such as lists of MeshDB users or API tokens |
A junior installer |
| Installer | All permissions from Read Only, plus the ability to edit all MeshDB core data (buildings, install details, member contact info, etc.) but no permission to add or delete these objects No access to authentication information such as lists of MeshDB users or API tokens |
Install leaders |
| Admin | Full access to every table in the the core MeshDB database. Add, Edit, Delete permissions on these tables. Full view access to all tables, including authentication related information: Groups, Users, API Tokens. Ability to create and modify users. No access to modify the underlying structure of groups or add new ones. |
Mesh administrative staff |
| Superuser | Full access to do anything in the application. Bypasses all permissions checks, for safety reasons, this should only be applied to devs working on the maintenance of MeshDB itself The main thing this unlocks is the ability to modify the structure of the group permissions themselves, which should not be done lightly |
MeshDB Core Devs |
Do not grant permissions directly on the user object. Add the user to the appropriate group instead. Since the permissions are cumulative, a user should only need to be in a single group. To reduce confusion, this is strongly recommended.
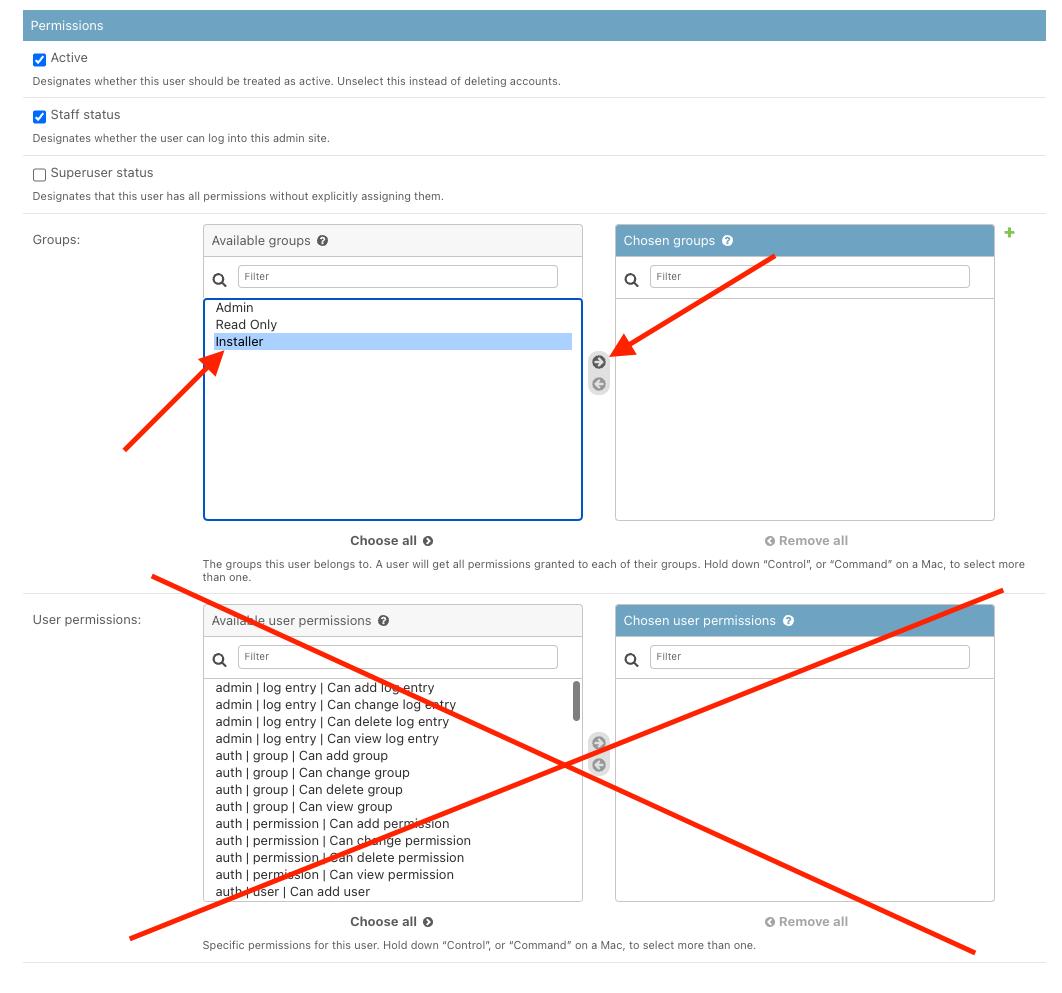
Add the user to the appropriate group and save
PGAdmin
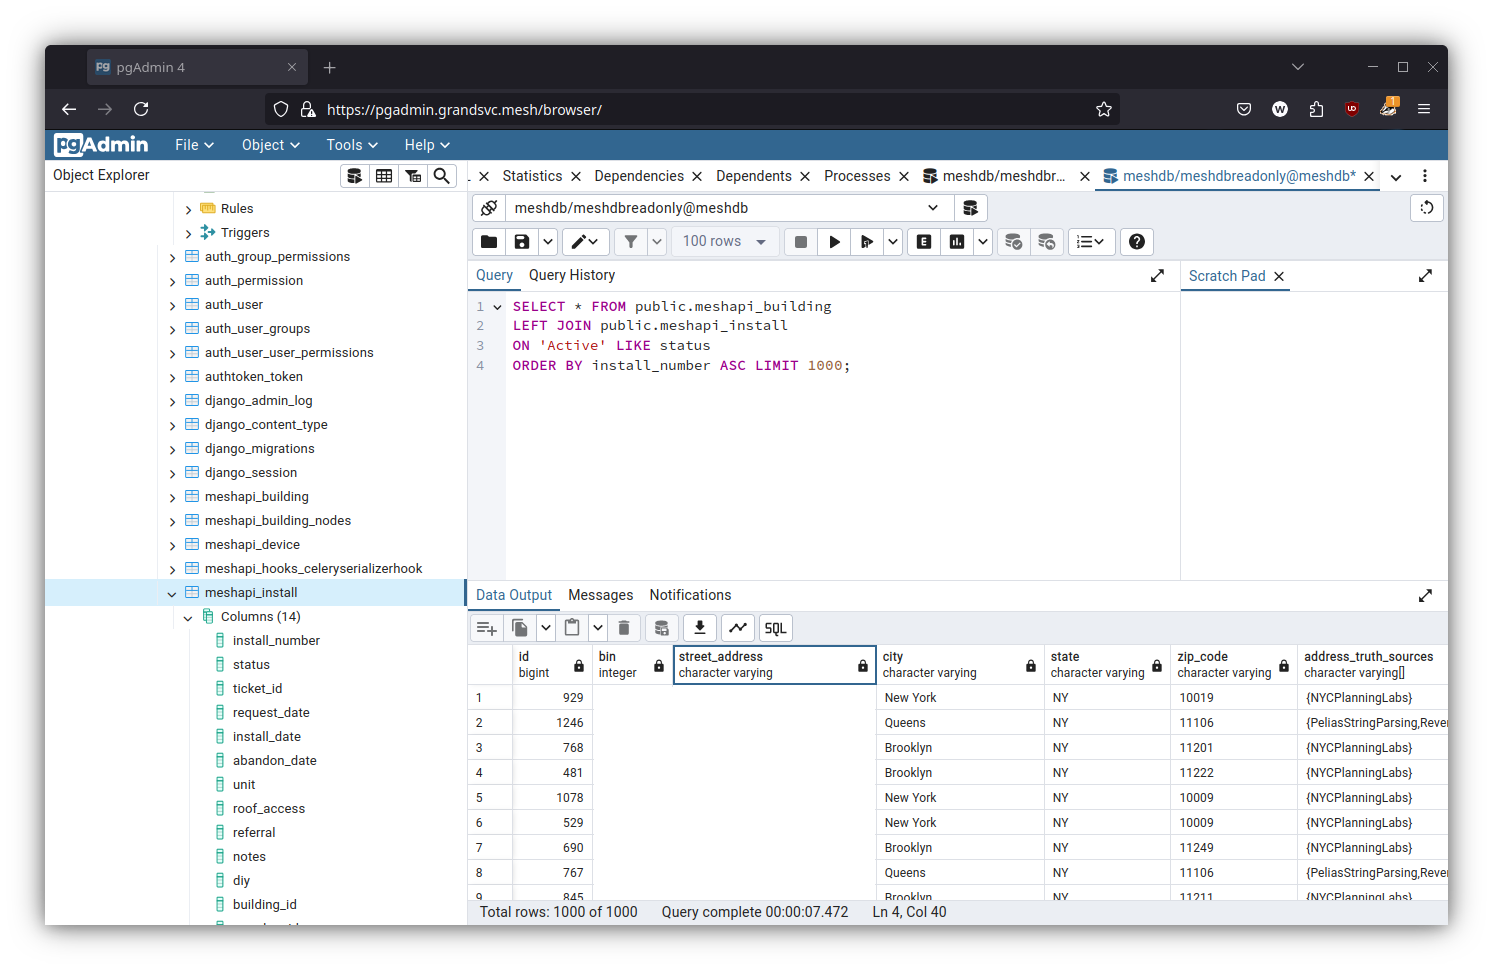
MeshDB exposes PGAdmin internally on the mesh at the following link:
It uses ACME certificates from Traefik to encrypt traffic, so it should be reasonably secure.
To get access, ask in the #meshdb channel for an account. This is a separate account from your MeshDB account, and is meant for folks who need more powerful READ ONLY access to MeshDB.
By default, your account will be authorized to access MeshDB's read-only Postgres user. If you really need write access for some reason (such as to fix a mistake using some SQL-Fu), please loop in an administrator.
How to bulk create installs for large buildings
These instructions detail how to provision many Install requests at once. Usually this is done at large buildings where the mesh serves many apartments. Often we install the equipment all at once during a renovation or construction without an explicit request from the resident of the apartment. In this scenario we need to create install numbers in our systems without asking each resident to submit the join form.
Create/Locate the Supporting Objects
Since MeshDB uses a relational model to store data, multiple objects need to be created to represent the equivalent of a single row in the "New Node Form" spreadsheet. Before we can create Install objects, we must first create Member and Building objects, and assign a network number. For more information about the various tables included in MeshDB, see MeshDB Schema Design.
The easiest way to do this is to submit the join form once on behalf of the building (if not already done previously). Once created, open this first install object in the MeshDB admin UI:
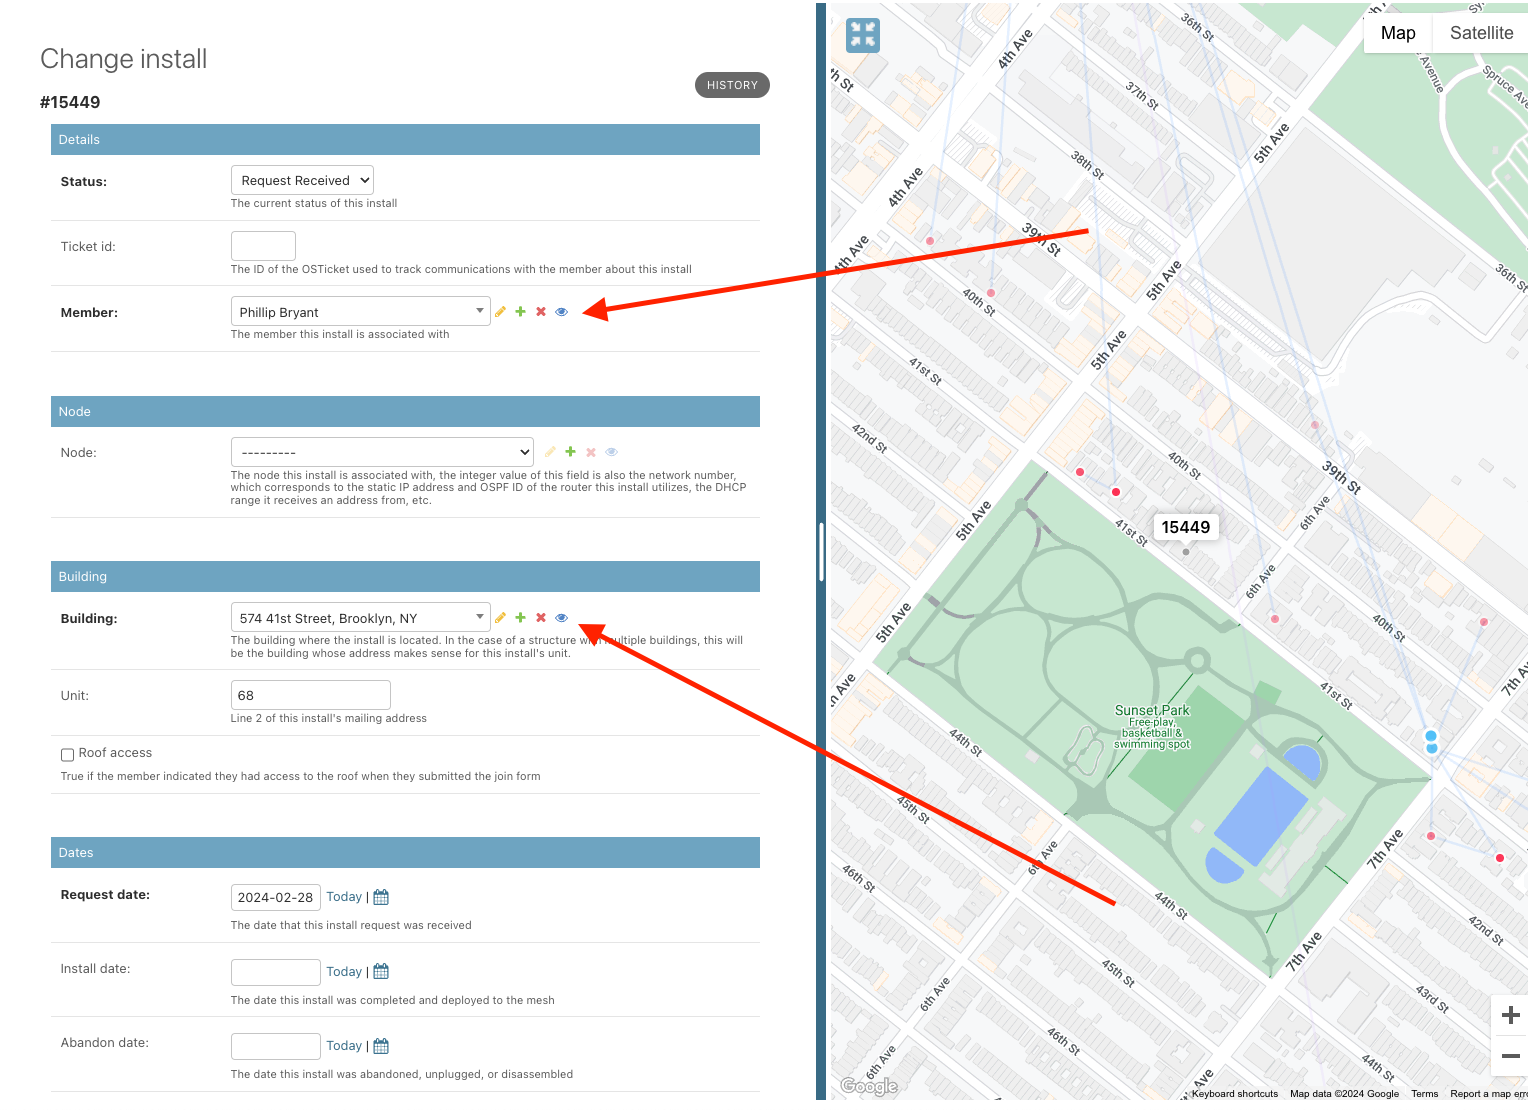
Use the eye icon next to the building and member entries to open the linked objects. On each object, note the object ID from the URL. For example, in the screenshots below, the meshdb member ID is 12219, and the meshdb building ID is 10858
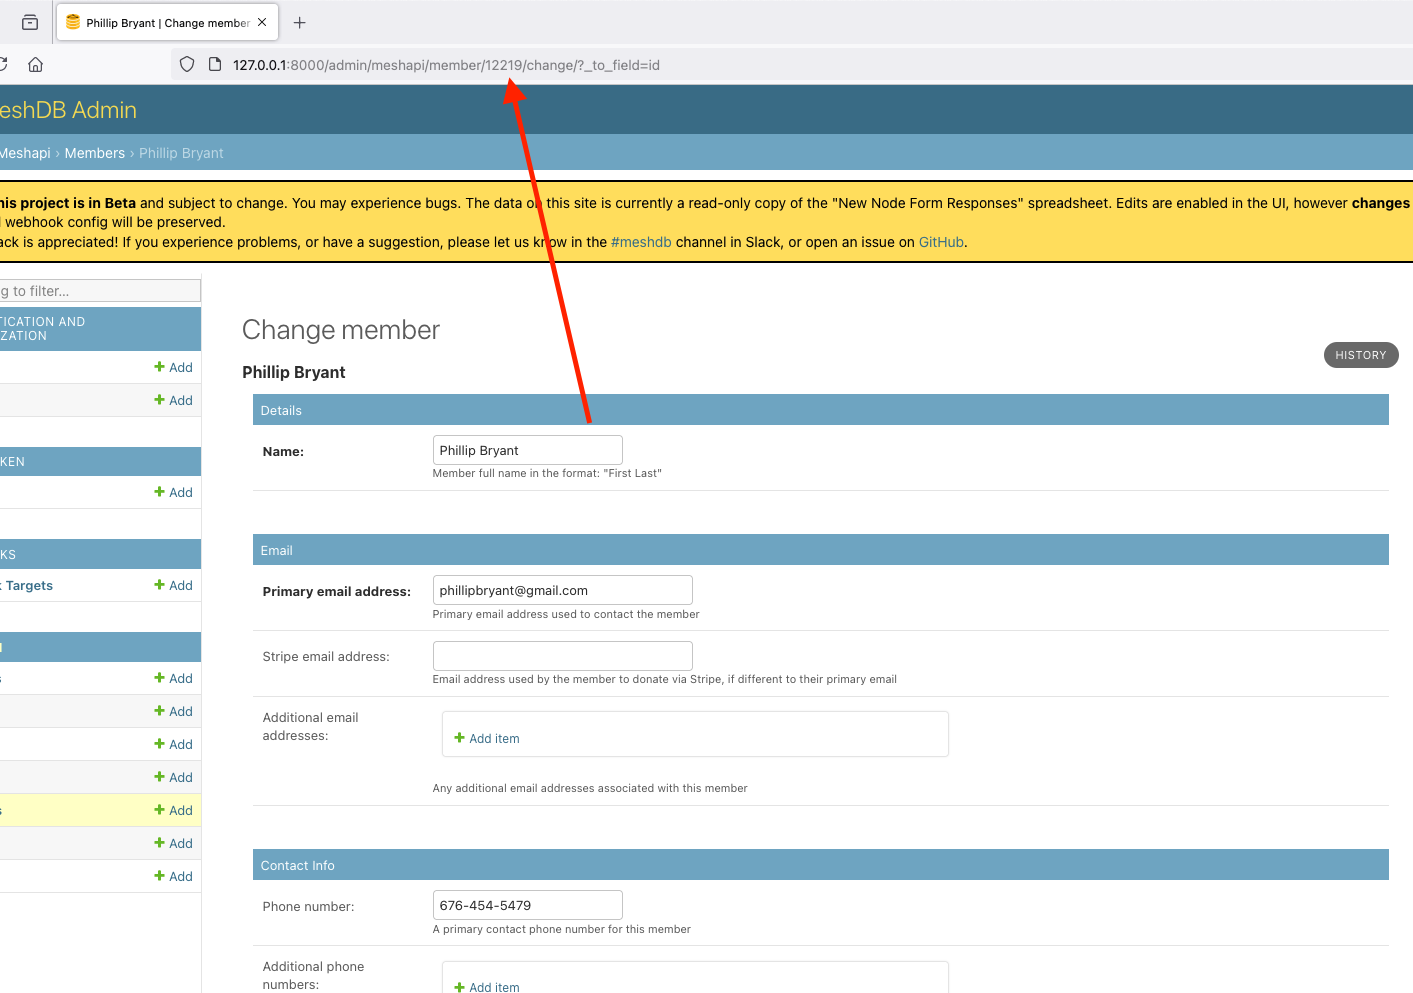
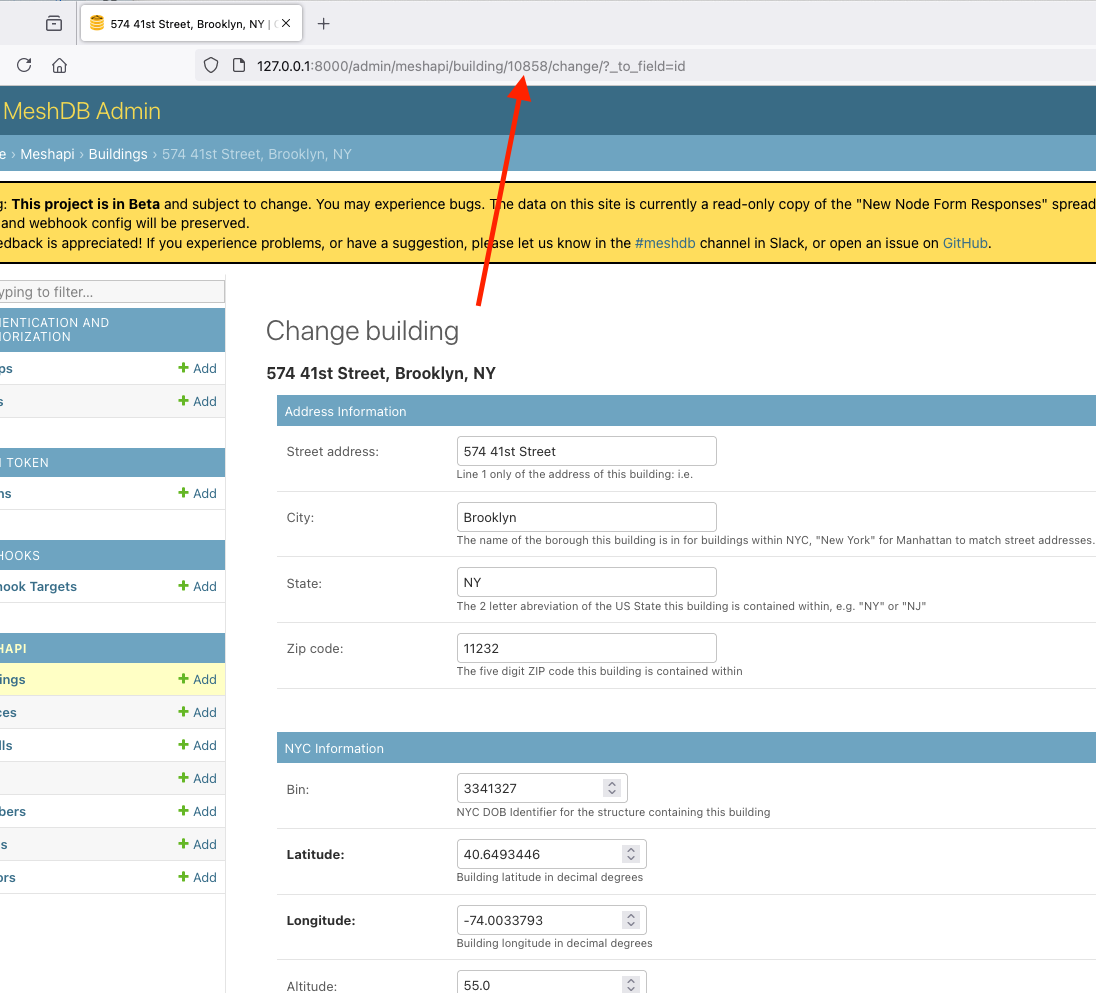
At this point, you should also assign this location a network number using the NN assignment tool. Use this "first" install to assign the NN, and make a note of the network number output by the tool.
Build the import CSV
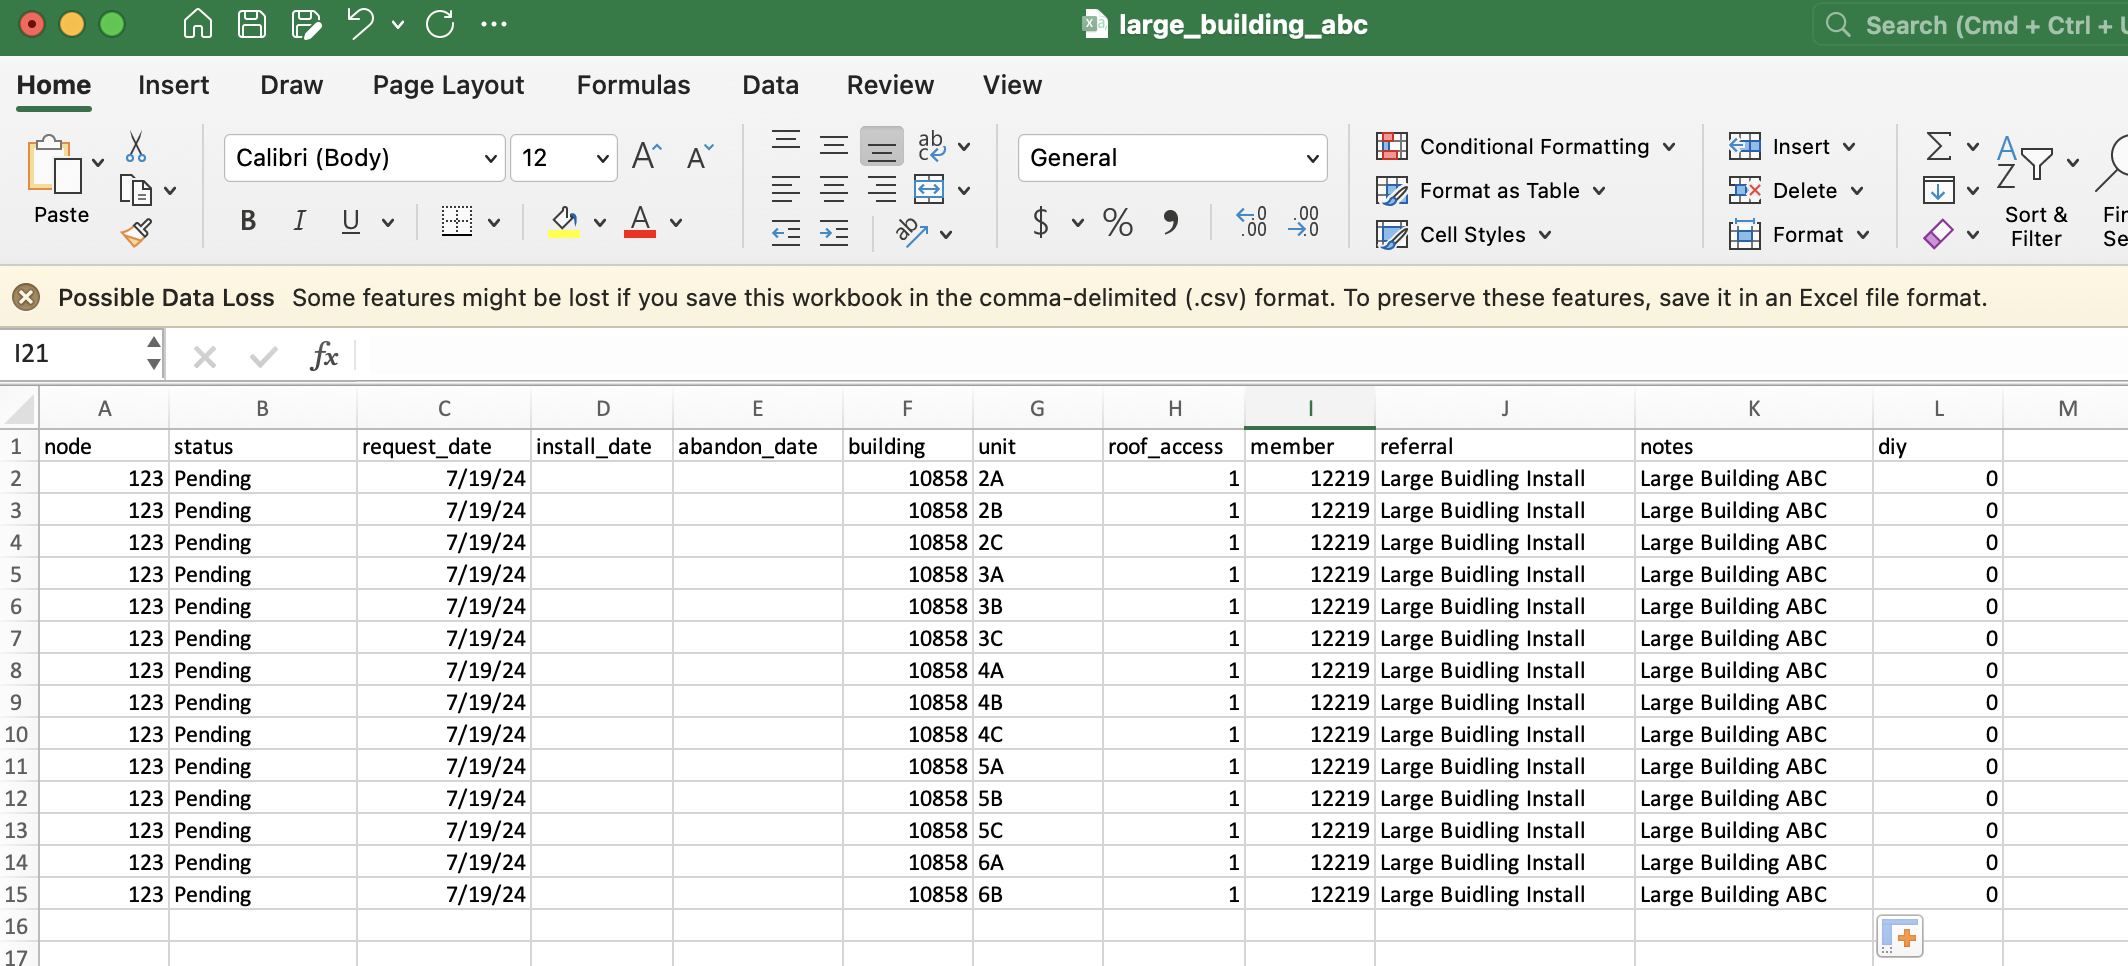
In order to create the install requests in bulk, we need to place the necessary information in a tabular format. Several formats are supported, but for these instructions we will use CSV as it is the simplest to work with using standard spreadsheet applications such as Excel or Google Sheets. To start, open the following CSV template in your favorite spreadsheet application (you will need to paste this into a text editor and save it as a .csv file):
node,status,request_date,install_date,abandon_date,building,unit,roof_access,member,referral,notes,diy
123,Pending,07/19/2024,,,10858,2A,1,12219,Large Buidling Install,Building Name,0
123,Pending,07/19/2024,,,10858,2B,1,12219,Large Buidling Install,Building Name,0
123,Pending,07/19/2024,,,10858,2C,1,12219,Large Buidling Install,Building Name,0
123,Pending,07/19/2024,,,10858,3A,1,12219,Large Buidling Install,Building Name,0
123,Pending,07/19/2024,,,10858,3B,1,12219,Large Buidling Install,Building Name,0
123,Pending,07/19/2024,,,10858,3C,1,12219,Large Buidling Install,Building Name,0
123,Pending,07/19/2024,,,10858,4A,1,12219,Large Buidling Install,Building Name,0
123,Pending,07/19/2024,,,10858,4B,1,12219,Large Buidling Install,Building Name,0
123,Pending,07/19/2024,,,10858,4C,1,12219,Large Buidling Install,Building Name,0
123,Pending,07/19/2024,,,10858,5A,1,12219,Large Buidling Install,Building Name,0
123,Pending,07/19/2024,,,10858,5B,1,12219,Large Buidling Install,Building Name,0
123,Pending,07/19/2024,,,10858,5C,1,12219,Large Buidling Install,Building Name,0
123,Pending,07/19/2024,,,10858,6A,1,12219,Large Buidling Install,Building Name,0
123,Pending,07/19/2024,,,10858,6B,1,12219,Large Buidling Install,Building Name,0
Edit the following columns based on the information collected above:
node- set all rows to the NN assigned for this locationstatus- likelyPendingfor all rows, though if some equipment has already been installed,ActiveorInactivemay be more appropriate. See MeshDB Status Values for more information about each value and when it is most appropriaterequest_date- set all rows to the current date in the formatMM/DD/YYYYinstall_date- leave blank or set to the date of the equipment installation as appropriateabandon_date- leave blankbuilding- set all rows the MeshDB numerical ID of the building as identified aboveunit- enter the unit number for each install request as provided/defined by the building ownerroof_access- enter1(true) or0(false) to indicate if access to the roof is available at this sitemember- set all rows the MeshDB numerical ID of the member object created for the "original install" as identified above- This is not the only option, it is possible to create different member objects for each install row if contact information is available, see the section titled "Bulk Add Members" below for more info
referral- optional, a but good place to indicate this install was created for a large buildingnotes- optional, but a good place to indicate the name of the building/node that these installs belong todiy- enter0(false) for all rows to indicate that these installs are conducted by volunteers, not DIYers
The following columns can be optionally added to the csv, but should not be unless there is a good reason, and you know what you're doing:
install_number- under normal circumstances this should not be specified manually, since these are automatically assigned by meshdb when the installs are importedticket_id- meshdb will automatically create OSTicket entries for each install request as needed. Do not manually create these
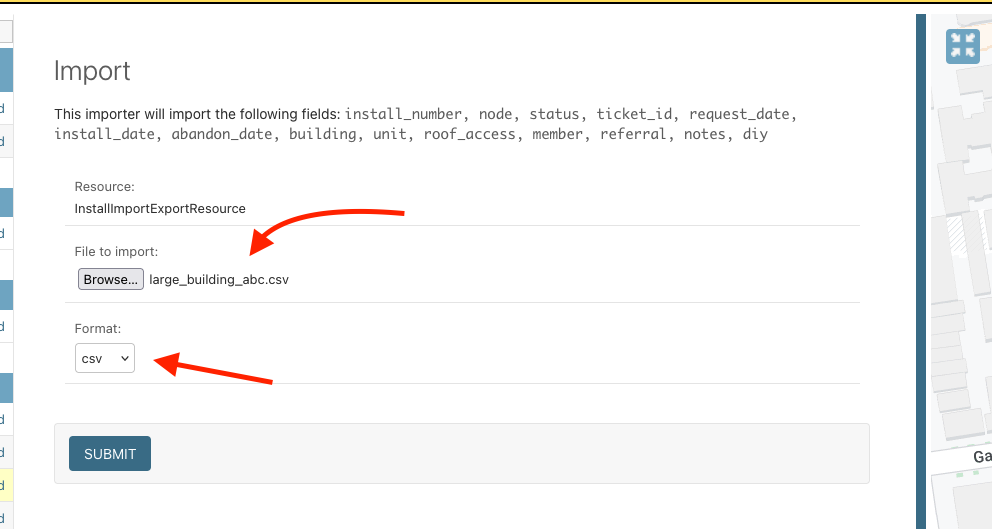
Import your CSV into MeshDB
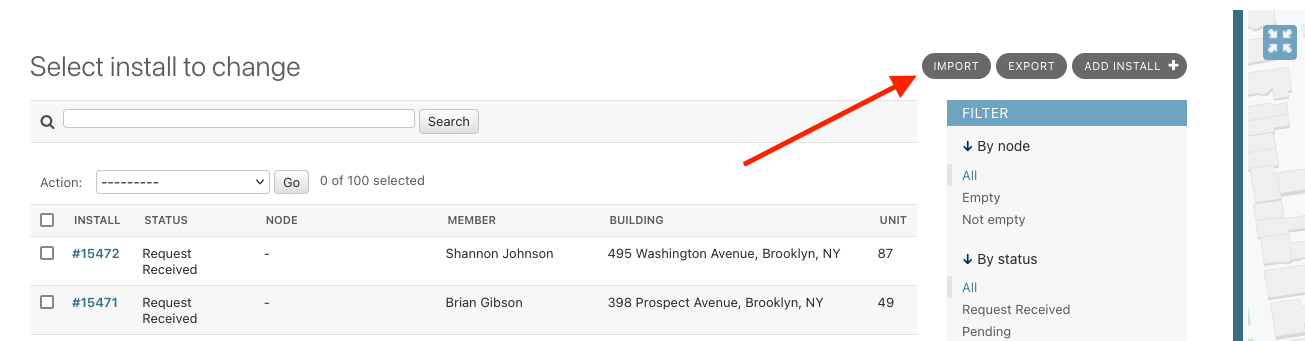
Select your CSV file, and select CSV as the format in the dropdown:
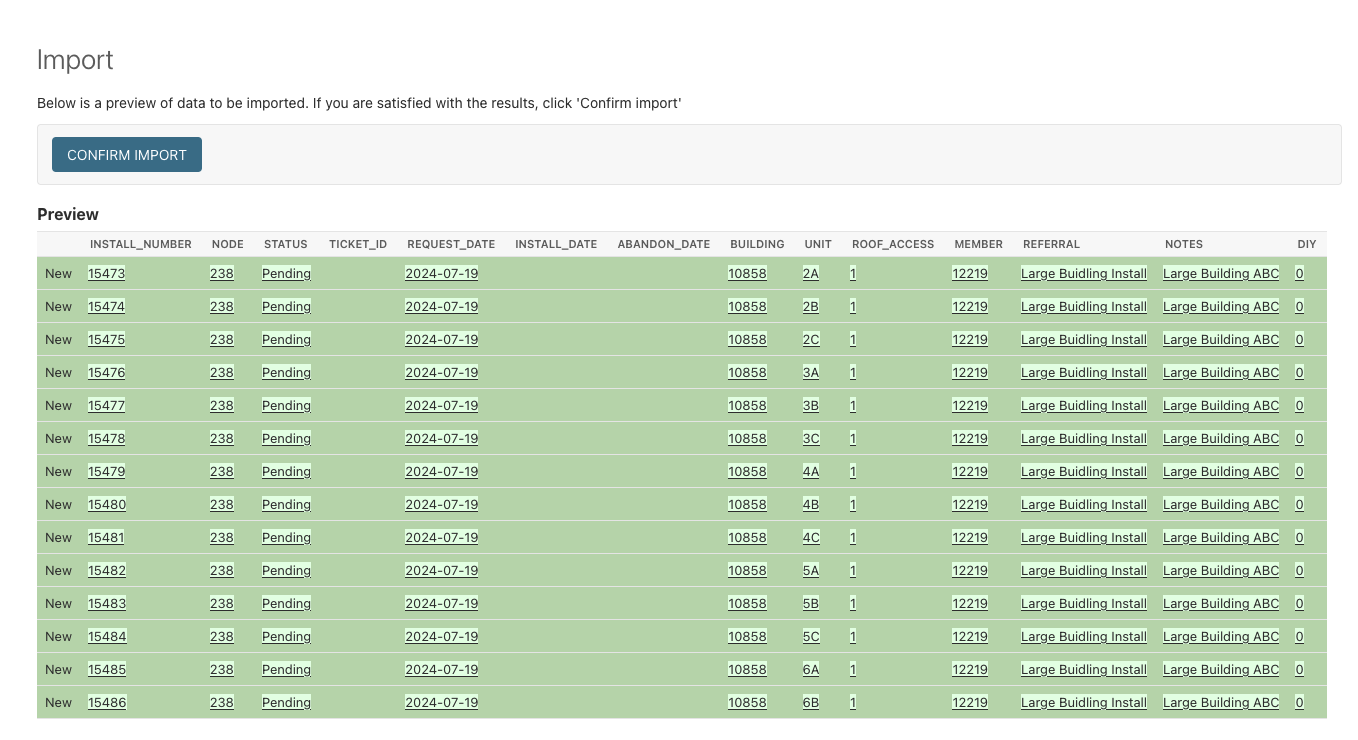
Review the information available on the confirmation screen for correctness, note the generated install numbers if desired and select "confirm import" to create the new installs in the database:
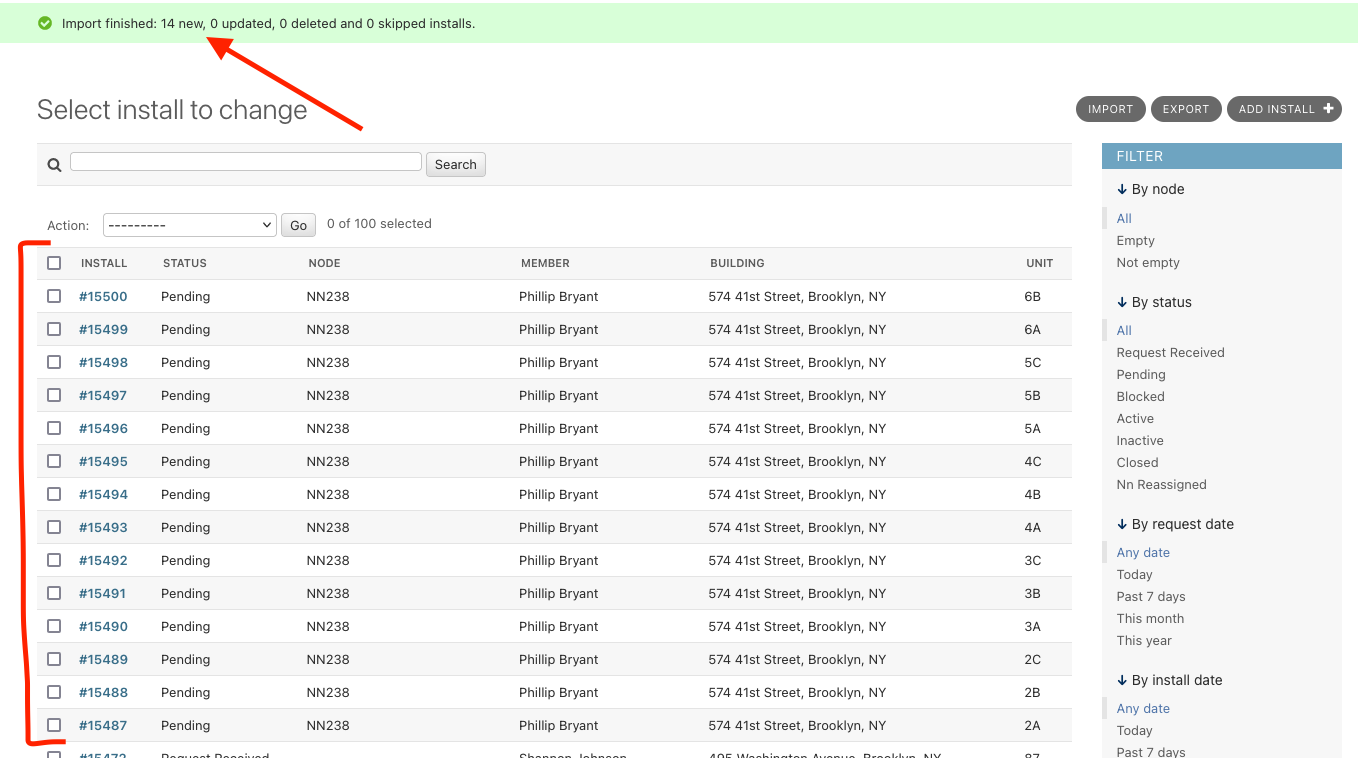
Check to make sure the correct number of installs was created, and observe the newly created install rows in the "all installs" view:
Bulk Add Members
The instructions above assume that contact information is not available for the members that will reside in the created install objects. However, if this information is available, and you'd like to create install objects with the correct contact information associated with each, first create a CSV for the member objects using the following template (you will need to paste this into a text editor and save it as a .csv file):
name,primary_email_address,stripe_email_address,additional_email_addresses,phone_number,additional_phone_numbers,slack_handle,notes
Tami Gibson,tamigibson@gmail.com,,,+1 555 555 5555,,,
Jean Williams,jeanwilliams@gmail.com,,,+1 555 555 5555,,,
Shari Martinez,sharimartinez@gmail.com,,,+1 555 555 5555,,,
Melinda Martin,melindamartin@gmail.com,,,+1 555 555 5555,,,
Edit the following columns based on the information available for each member:
name- the member's first and last nameprimary_email_address- the member's email addressstripe_email_address- likely this leave blank (used to indicate if the member has signed up in stripe with a different email)additional_email_addresses- likely leave blank (used to indicate if the member has other emails than their stripe and primary addresses). If provided, must be a comma separated list of email addressesphone_number- the member's phone number, in the format+1 555 555 5555additional_phone_numbers- likely leave blank (used to list additional phone numbers for the member). If provided, must be a comma separated list of phone numbers in the above formatslack_handle- likely leave blank, but can be set to the member's slack handle if availablenotes- optionally provide any notes about this member
The following columns can be optionally added to the csv, but should not be unless there is a good reason, and you know what you're doing:
id- under normal circumstances this should not be specified manually, since these are automatically assigned by meshdb when the members are imported
Import this CSV on the members screen, following the same instructions provided above for installs. Just take note of the member IDs provided on the import confirmation screen, and use these IDs in the member column in the installs CSV