Installing the Equipment (Install Guide - Part 2)
Now that you're on site for the install, it's time to install the equipment. If you're reading through this the first time, take a look at Typical Installs to see what typical mesh install looks like.
Usually, most volunteers start by visiting the member's apartment first. This is a good time to introduce yourself, explain what the install process will be and how long it will take. This is also a great time to answer any questions that the new member might have. You can also ask the member which window they want the cable to come in through. This us find the member's window once they are on the roof and can influence the location of the equipment on the roof.
Tip: Take note of a landmark outside the window that can help you find the window once you are on the roof.
For example: "There's a bus stop sign directly outside the window, and we're on the 2nd floor. So once I reach the roof I need to find the bus stop sign and then it's the 2nd window counting up from the ground."
Mounting the equipment on the same end of the roof as the member's window (if LOS allows) can help reduce the length of the cable run.
Determining the best location on the roof:
Once you reach the roof, take a look around at the other nearby buildings to identify the hub or nearby node to which you will connect.
Looking at the panorama photos posted in the Slack or OSTicket thread can be helpful to determine where the closest exiting mesh node might be located.
If there's a number of nearby nodes, take some time to look at each one's uplink path and to run a speed test on each one. Sometimes the closest node may not have the fastest connection, so you may choose to connect to a node that's further away that has a better connection.
When thinking about where you place the Omni on the roof, think about the nearby buildings and what locations could help nearby buildings connect in the future. Sometimes placing the omni in a certain place on the roof could allow nearby shorter buildings that may not have LOS themselves to connect through the node you are installing.
Here's a few things to think about:
- Avoid places where cables, the mast or the equipment itself could be a trip hazard. (Cables next to steps or ladders)
- Avoid placing omni's above active chimneys or sources of hot air. Also avoid any restaurant kitchen vents that may expel greasy air.
- Look for existing drain stacks, old satellite/antenna mounts, metal pipework, AC unit brackets or any other suitable objects you could mount the antennas to. This can reduce the time needed to drill a new mount into a wall.
- Avoid placing LiteBeams where trees will eventually grow into the antenna's beam. Trees will grow taller over time, so avoid placing antennas that closely over the top of them.
Installing the rooftop equipment:
Once you've figured out where to mount the equipment, grab your hose clamps and strap it up.
If you're mounting a mast, take time to ensure that it is solidly mounted. If you can move the mast with your hand, the wind will also be able to push it around, risking the antenna loosing alignment over time. Make sure masts are solidly mounted!
If you're attaching a mast to a J-Pole or W-Bracket, make sure you drill a screw into the pole to keep it from spinning in the mount. This is the most common encountered with J-Pole installs.
When mounting LiteBeams to poles, put some electrical tape around the pole first. This reduces the chance of the litebeam slipping on the pole.
Litebeams should be level when they are mounted. Use the level on the back of the litebeam to hold it level as you tighten down the clamp.
Running the cable to the apartment:
Run the cable down the side of the building to the member's apartment. Secure the cable on the roof and outside their window (if possible) with zip ties.
Make sure the cable has a drip loop before it passes through the wall / window into the building. This ensures that water won't run along the cable into the building.
For tips on drilling through window frames, see the Window Drilling Guide.
For a guide on crimping the outdoor network cable, see Crimping.
Connecting the apartment equipment:
Once you've run the cable into the apartment, connect the POE injector and router as illustrated in the following image.
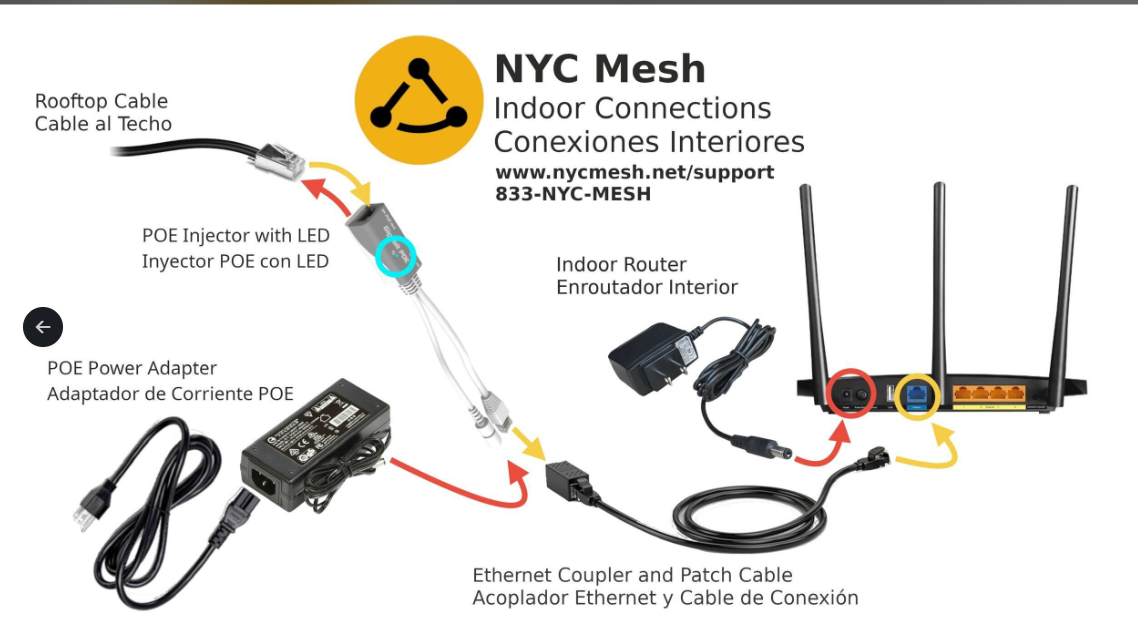
Ensure the outlet the router and POE are plugged into is on and working. We avoid plugging into power bars if possible as members accidentally turning them off has been a source of many support calls.
Follow the steps in TP-Link Indoor Router to configure the router.
We have stickers you can give to the member with their WiFi name and password. Otherwise write them down on a piece of paper for them to hold on to.
Confirming connection and testing: