Common Setup + Standards
Access
Human access should be provided via OIDC, which makes sure that individual user passwords do not need to be stored by proxmox. Individual accounts also help keep track of "who did what when".
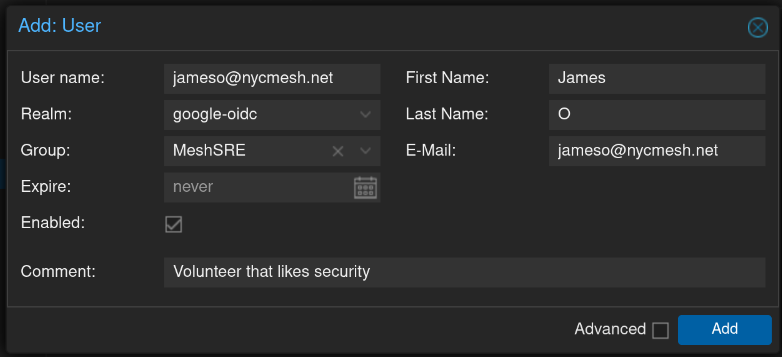
Providing Access
- Login to the proxmox instance that has had OIDC configured.
- Within "Datacenter" (the top level of the tree), navigate to "Permissions" -> "Users".
- Add a new user. "Username" and "email" should be your @nycmesh.net email. Permissions are provided to the user by "Group" which is configured separately.

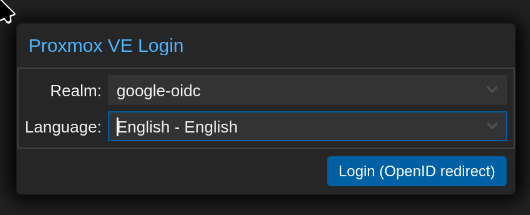
Logging In
- Switch the "Realm" to "google-oidc"

- Click "Login"
- Select the authorized account (your @nycmesh.net email)
- Click through the consent screen if needed
- You are logged in
Tagging
Resources must be tagged to the owner(s) and service. Un-tagged resources are subject to automatic removal.
| Tag Name | Tag Type | Description |
| jameso | Person | Maintained by James |
| meshdb | Service | Maintained by to the meshdb project |
| soc |
Service |
Maintained by the MeshDB SOC (a.k.a. James) |
| willard |
Person |
Maintained by Willard |
| managed_by_iac | Statement | Manual changes are only welcome to resolve emergencies and are likely to be undone without notice. |
Template Images
Save future you some time by using a cloud image. This will give you a pre-provisioned linux system without needing to go through the installer. When using these, remember:
- Do not start the template image, this will break it
- When cloning any template image, make sure that "Mode" is "Full Clone" NOT A "Linked Clone"
How debian-cloud (5001) was setup
If you are doing this yourself, you'll need to pick a number in the 5XXX range that is not already taken.
- Get the cloud image, add the guest agent. You may need libguestfs-tools
wget https://cloud.debian.org/images/cloud/bookworm/20240429-1732/debian-12-generic-amd64-20240429-1732.tar.xz tar -xf debian-12-generic-amd64-20240429-1732.tar.xz virt-customize -a disk.raw --install qemu-guest-agent - scp the modified image to jon
scp disk.raw root@10.70.90.52:/root/debian-12-generic-amd64-20240429-1732-qemu-guest-agent.raw - On jon, create a template VM and import the image
qm create 5001 --memory 2048 --core 2 --name debian-cloud --net0 virtio,bridge=vmbr0 qm importdisk 5001 debian-12-generic-amd64-20240429-1732-qemu-guest-agent.raw local-lvm qm set 5001 --scsihw virtio-scsi-pci --scsi0 local-lvm:vm-5001-disk-0 qm set 5001 --ide2 local-lvm:cloudinit qm set 5001 --boot c --bootdisk scsi0 qm set 5001 --serial0 socket --vga serial0 qm set 5001 --ipconfig0 ip=dhcp qm set 5001 --agent 1 qm template 5001 - Find the VM (5001) in the proxmox UI. Look review configuration.
Using debian-cloud (5001)
- Log into proxmox
- Right click VM 5001 and click "Clone"
- Make sure you use "Full Clone"
- In you clone, go to "Cloud-Init" and set the username, password and/or ssh key
- Make sure the disk size is large enough for your needs
- Start the VM, give it a few minutes to go through the cloud-init process and update packages.
- Do something great for the mesh!
No comments to display
No comments to display